Add a Linux Monitor
Install the Linux Monitoring Agent to monitor the performance and usage of your Linux servers. Monitor and measure critical metrics like CPU, memory, disk utilization, processes and network traffic of Linux servers from a unified dashboard. Site24x7 uses the server monitoring Agent to collect performance data from your servers.
Supported Linux Flavors:
Site24x7 Linux Server Monitoring Agent supports various Linux distributions, including Debian, Ubuntu, CentOS, Red Hat, Oracle Linux, Amazon Linux, SUSE, Raspberry Pi, and ARM processor servers. The detailed list of versions supported (compatibility matrix) is given in this Knowledge Base document. Python 3.0 is the minimum version required for Raspberry Pi, ARM processor, and other custom Linux distributions.
How to
- Add a Linux monitor
- Restart the Linux agent
- Edit/Modify existing Linux monitors
- Bulk installation methods
- Uninstall the Linux agent
- Security
- Licensing
Other Features
- Resource check profiles - Monitor files, directories, syslogs
- IT Automation
- Configuration rules
- Plugin integrations
- Associate configuration profiles during agent installation
- Troubleshooting tips
Add a Linux Monitor
- Log in to Site24x7 and go to Server > Server Monitor > Servers (+) > Linux. You can also navigate via Admin > Inventory > Add Monitor > Linux Server Monitoring.
- Use the toggle button to install the agent as root or non root, and run the agent as root or non root after installation.
For example, to install the agent as a root user and run the agent as non root with proxy enabled, execute the following command:wget https://staticdownloads.site24x7.com/server/Site24x7InstallScript.sh
bash Site24x7InstallScript.sh -i -key=<device key> -automation=trueNoteRefer to our Knowledge Base document to understand more on the differences between root and non root installations.
- Click on Copy to Clipboard to copy+paste the commands and execute them to download and install the Linux agent. The command given is independent of the OS architecture: 32-bit or 64-bit.
Once the agent is installed, you can view the monitor under Server > Server Monitor > Servers.
If you were unable to install the Linux server Monitoring Agent through the above methods, execute the following commands in the Linux terminal depending on whether the OS is 32-bit or 64-bit. Use the Device Key to authenticate the installation of the Linux agent.
- x86_64:
sudo wget https://staticdownloads.site24x7.com/server/Site24x7_Linux_64bit.install
sudo chmod 755 Site24x7_Linux_64bit.install
sudo ./Site24x7_Linux_64bit.install -i -key=<DEVICE_KEY> -automation=true
To install the agent using organizational proxy:
sudo wget https://staticdownloads.site24x7.com/server/Site24x7_Linux_64bit.install
sudo chmod 755 Site24x7_Linux_64bit.install
sudo ./Site24x7_Linux_64bit.install -i -key=<DEVICE_KEY> -automation=true -proxy=user:password@proxyhost:proxyport
or
sudo ./Site24x7_Linux_64bit.install -i -key=<DEVICE_KEY> -automation=true -proxy=host:port - x86_32:
sudo wget https://staticdownloads.site24x7.com/server/Site24x7_Linux_32bit.install
sudo chmod 755 Site24x7_Linux_32bit.install
sudo ./Site24x7_Linux_32bit.install -i -key=<DEVICE_KEY> -automation=true
To install the agent using organizational proxy:
sudo wget https://staticdownloads.site24x7.com/server/Site24x7_Linux_32bit.install
sudo chmod 755 Site24x7_Linux_32bit.install
sudo ./Site24x7_Linux_32bit.install -i -key=<DEVICE_KEY> -automation=true -proxy=user:password@proxyhost:proxyport
or
sudo ./Site24x7_Linux_32bit.install -i -key=<DEVICE_KEY> -automation=true -proxy=host:port
Restart the Linux Agent
Execute the below commands based on the user type:
Root user:
sudo /opt/site24x7/monagent/bin/monagent restart
Non root user:
<home_dir_of_user_who_installed_the_agent>/site24x7/monagent/bin/monagent restart
Edit/Modify Existing Linux Monitors
- Log in to Site24x7 and go to Server > Server Monitor > Servers > click on the Linux server monitor you wish to edit.
- Next to the display name, hover over the hamburger icon and click Edit.
- Edit and change the display name, monitor group, dependency on monitor, threshold and availaibility profile, notification profile, user groups, tags, resource check profiles and more.
Note
The Host Name, IP address and Associated Configuration Template are also listed. These fields cannot be edited.
- Set the Poll Interval i.e. the frequency for data collection. You can choose from a range of 1 min, 5 min, 10 mins, 15 mins, 30 mins, 1 hour, 3 hours, 6 hours, 12 hours, and one day. Read on to find out how to edit the frequency interval.
- Use the toggle button to enable or disable Syslog Monitoring. Once an option is chosen and changes are saved, the agent will restart the syslog service.
- Integrate new or remove existing Third Party Integrations from Site24x7.
- Click Save to save your changes.
Uninstall the Linux Agent
Execute the below commands based on the user type:
Root user:
sudo /opt/site24x7/monagent/bin/uninstall
Non root user:
<home_dir_of_user_who_installed_the_agent>/site24x7/monagent/bin/uninstall
Bulk Installation Methods
- Chef
- Puppet
- SaltStack
- Ansible
- Remote Installation using SSH
- Add as a VM extension in Azure
- Via Google Cloud Platform (GCP)
- Via DigitalOcean User Interface
- While launching an Amazon Machine Image
- Using AWS Elastic Beanstalk
- Using ManageEngine Endpoint Central
Add the Linux Monitoring Agent via Google Cloud Platform (GCP)
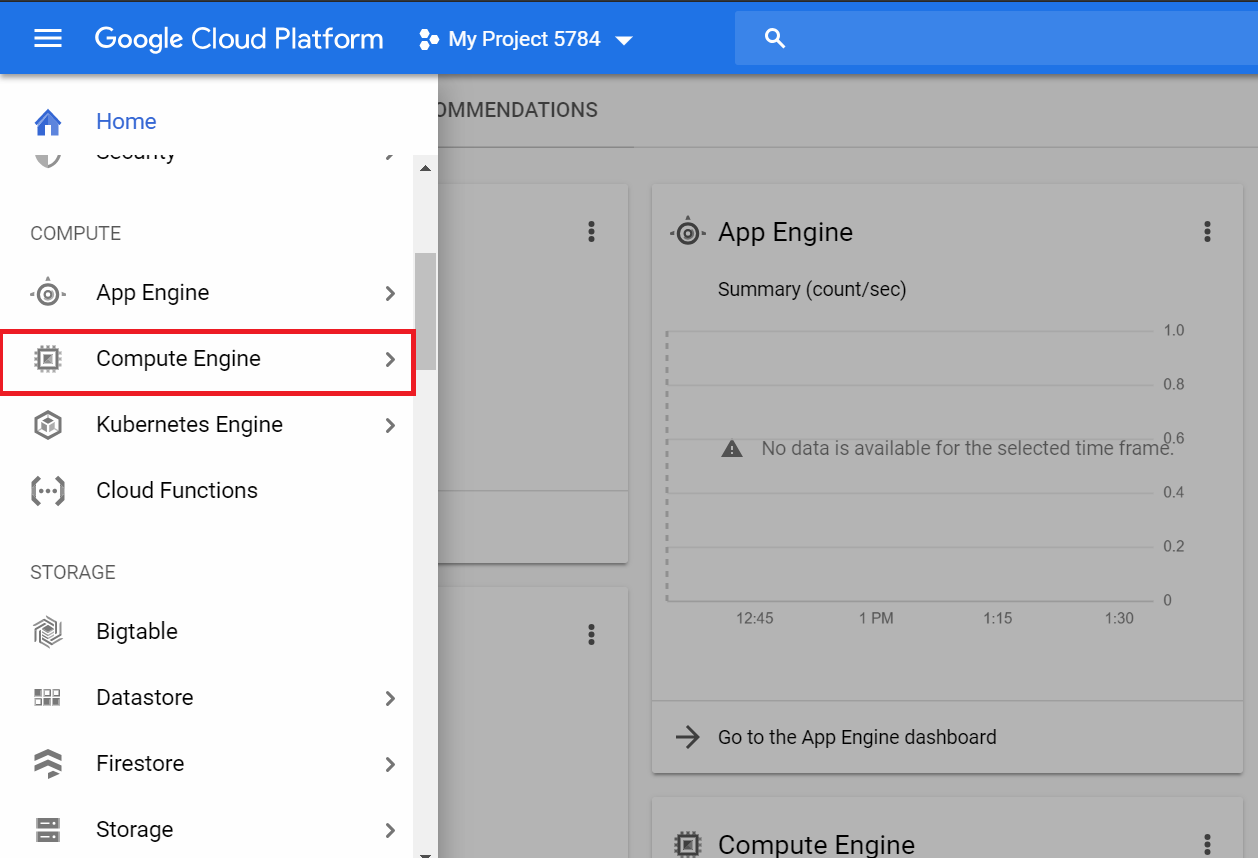
- Log in to the Google Cloud Platform (GCP) console. Click on Compute Engine.
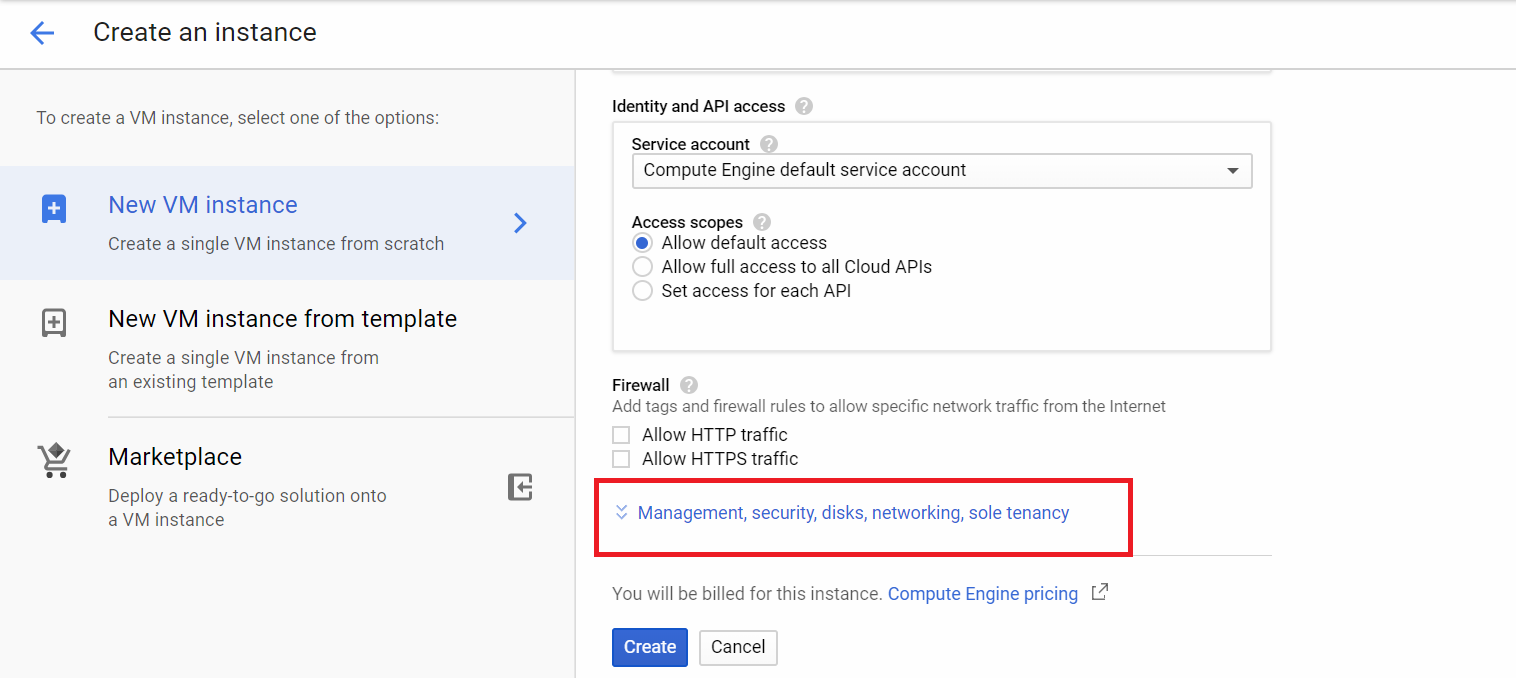
- In the Compute Engine page, click on CREATE INSTANCE.

- Scroll down and click on Management, security, disks, networking, sole tenancy.
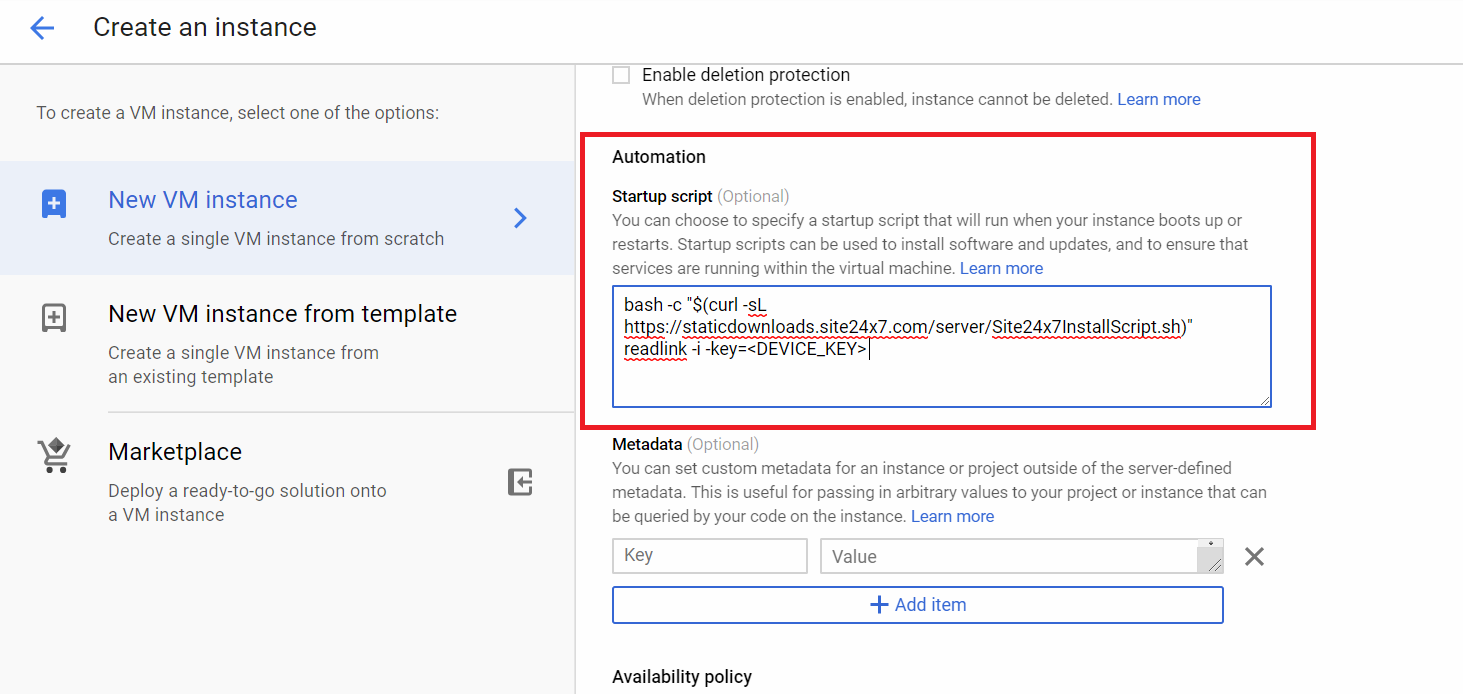
- Under Automation, paste the following in the Startup Script text box. Replace the DEVICE_KEY parameter with the key given in the Site24x7 web client. Learn more.
bash -c "$(curl -sL https://staticdownloads.site24x7.com/server/Site24x7InstallScript.sh)" readlink -i -key=<DEVICE_KEY> -automation=true
- Click Create. The agent will be installed in your GCE instance.
Add the Linux Monitoring Agent via DigitalOcean user interface
- Log in to your DigitalOcean user interface.
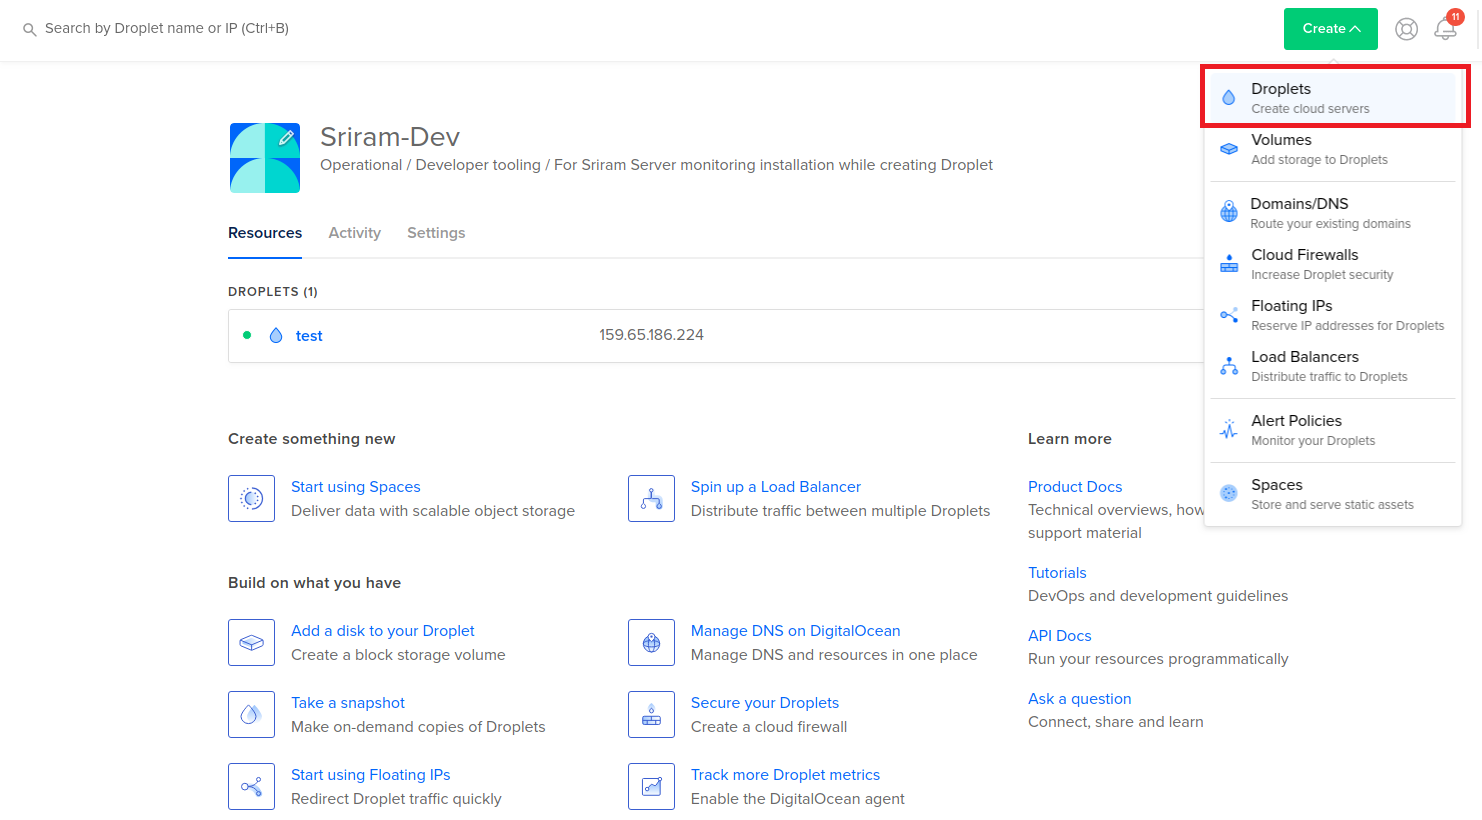
- Click on Create > Droplets.
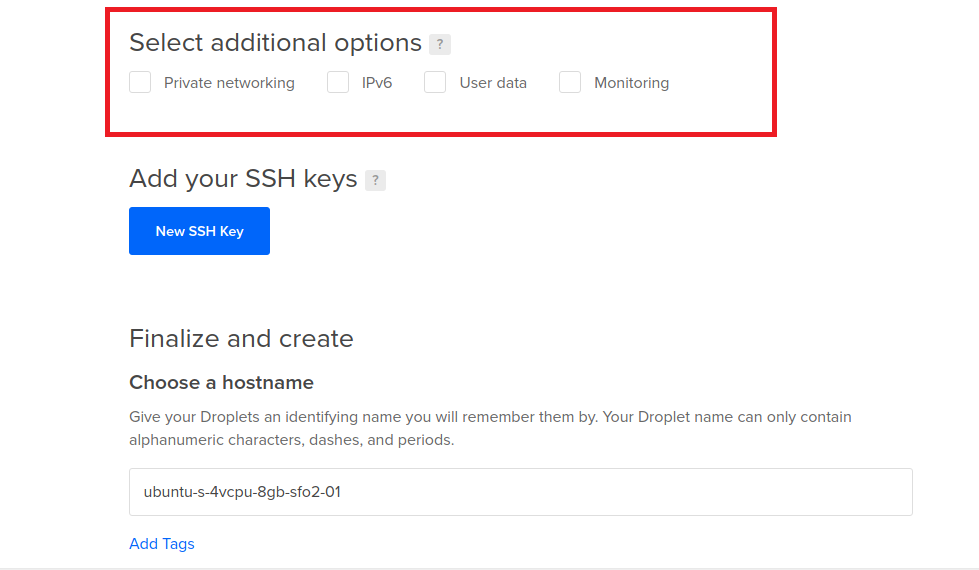
- Under Select Additional Options, check the option User Data.
- Copy and paste the following into the User Data text box. Replace the DEVICE_KEY parameter with the key given in the Site24x7 web client. Refer to this help document to learn more about your device key.
#cloud-config
runcmd:
- bash -c "$(curl -sL https://staticdownloads.site24x7.com/server/Site24x7InstallScript.sh)" readlink -i -key=<DEVICE_KEY> -automation=true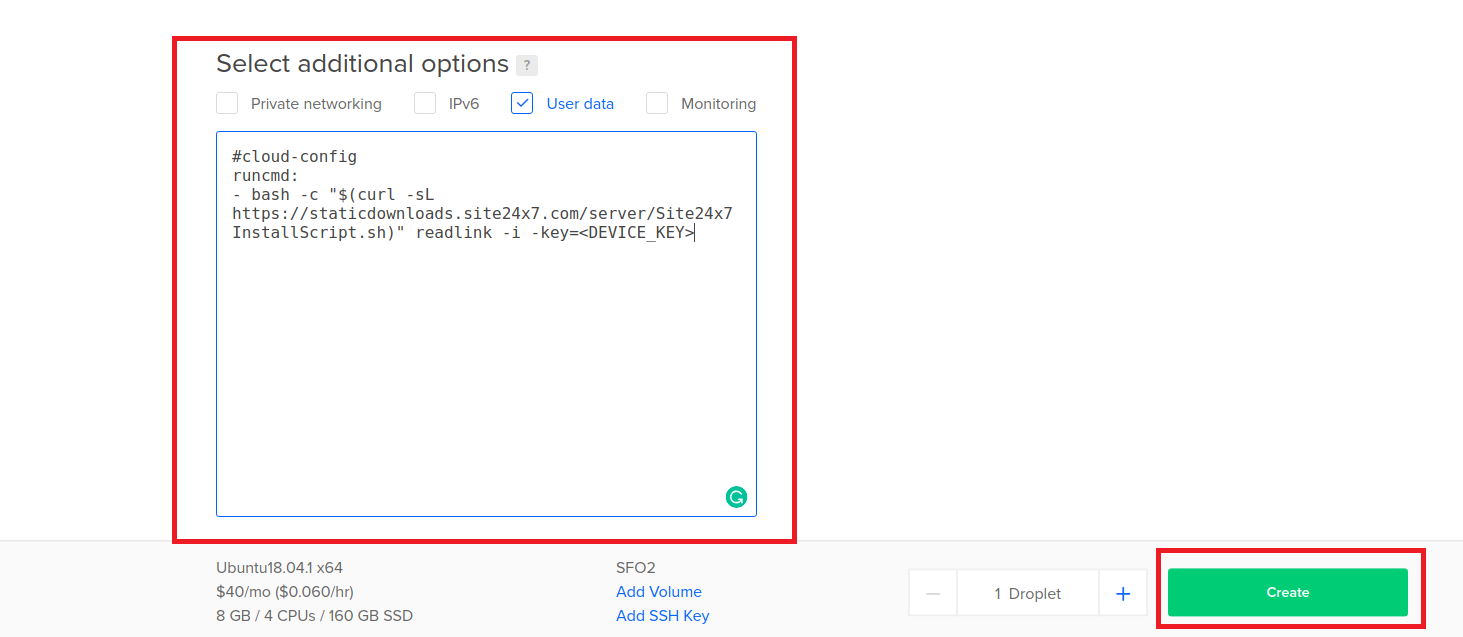
The agent will be installed in your DigitalOcean Droplet. You can also use APIs to install the agent. Learn more.
Install the Linux Agent while Launching an Amazon Machine Image
Use any of the following methods to install the Linux agent via an Amazon Machine Image:
Launching an already Created Amazon Machine Image (AMI) via EC2 Management Console:
- Download and save the file InstallSite24x7LinuxAgent.sh in your local machine.
- Edit the script file to include your device key in DEVICE_KEY="""
- Log in to your EC2 management console and navigate to Request Instances Wizard > Instance Details > User Data.
- Click the Browse option and upload the InstallSite24x7LinuxAgent.sh file that is saved in your local disk.
- Proceed with the AMI launching instance.
Creating a New Amazon Machine Image:
/etc/rc.local is the script file that is always called during the boot time of a Linux server. Adding the following script in the /etc/rc.local file will trigger installation of Site24x7 Linux agent, when the new instance boots.
64-bit: AMI
if [ ! -f /etc/init.d/site24x7monagent ]; then
wget https://staticdownloads.site24x7.com/server/Site24x7_Linux_64bit.install
chmod 755 Site24x7_Linux_64bit.install
./Site24x7_Linux_64bit.install -i -key=<DEVICE_KEY> -automation=true
fi
32-bit: AMI
if [ ! -f /etc/init.d/site24x7monagent ]; then
wget https://staticdownloads.site24x7.com/server/Site24x7_Linux_64bit.install
chmod 755 Site24x7_Linux_32bit.install
./Site24x7_Linux_32bit.install -i -key=<DEVICE_KEY> -automation=true
fi
Installing the Agent during AWS Autoscaling:
Autoscaling allows you to scale your Amazon EC2 capacity according to the conditions defined by you. When additional resources are allocated, you can choose to install Site24x7 Linux agent in the additional resources. Follow the steps below:
- Download and save the file InstallSite24x7LinuxAgent.sh in your local machine.
- To create launch configuration:
For exampleas-create-launch-config <CONFIG_NAME> --image-id <AMI_ID> --instance-type <INSTANCE_TYPE> --user-data-file InstallSite24x7LinuxAgent.sh
as-create-launch-config TestLaunchConfig --image-id ami-bd4ed56f --instance-type t1.micro --user-data-file InstallSite24x7LinuxAgent.sh
- To update autoscaling group:
For exampleas-update-auto-scaling-group <GROUP_NAME> --launch-configuration <CONFIG_NAME>
as-update-auto-scaling-group TestAutoScalingGroup --launch-configuration TestLaunchConfig
- Scaling down in AWS
If an integrated EC2 instance is stopped/terminated by an autoscaling group, both the EC2 instance and the server agent won't alert it as Down
Agent Installation via AWS templates:
In AWS CloudFormation, applications can be launched via templates associated to AMIs. To install the Site24x7 Linux agent, add the following as part of UserData to the template used for launching applications:
"UserData" :{
"Fn::Base64" : {
"Fn::Join" : [ ",", [
"#!/bin/bash\n",
"sudo wget https://staticdownloads.site24x7.com/server/Site24x7_Linux_64bit.install\n",
"sudo chmod 755 Site24x7_Linux_64bit.install\n",
"sudo ./Site24x7_Linux_64bit.install -i -key=<DEVICE_KEY> -automation=true\n"]]
}
}
Installation via AWS Command Line Interface (CLI):
- Download and save the file InstallSite24x7LinuxAgent.sh in your machine.
- Edit the script file to include your device key in DEVICE_KEY=""
- Run the following command in your CLI:
ec2-run-instances --key KEYPAIR --user-data-file InstallSite24x7LinuxAgent.sh ami-bf5eb9d6
NoteFor instructions on how to install AWS CLI, refer here.
Add the Linux Monitoring Agent using AWS Elastic Beanstalk
- Create a folder named
.ebextensionsin the root folder of your application source bundle. - Inside the
.ebextensionsfolder, execute the following command after replacing the <device key> with the device key given in the Site24x7 web client:
echo -e 'commands:
# Download site24x7-server-agent install script
     "01-agent-script-download":
         command: sudo curl -o /etc/Site24x7InstallScript.sh https://staticdownloads.site24x7.com/server/Site24x7InstallScript.sh
# Install site24x7-server-agent in ebs instance
     "02-install-site24x7-server-agent":
command: bash /etc/Site24x7InstallScript.sh -i -key=<device key> -automation=true -installer=aws_ebs' >> site24x7-linux-agent.config - Deploy your application with either Elastic Beanstalk Console, EB CLI, or AWS CLI.
Resource Check Profiles
Resource check profiles can be used to monitor internal resources like files, directories, and syslogs. The resources to be monitored should be added as checks to a resource check profile and this profile can be associated to any number of server monitors. You can also edit or delete a resource check profile.
A profile that is associated with a server monitor cannot be deleted, it can only be edited. Being an irreversible action, caution must be taken before deleting the profile.
IT Automation
Reduce manual intervention and bring in an automated workflow to take action during an alert event. Add an automation
Configuration Rules
Configuration templates have been deprecated. Use Configuration Rules to create better pre-defined actions and automate the configuration settings of your monitoring resources.
Plugin Integrations
Monitor your entire IT stack with our ready-to-use plugin integrations or write your own plugin using Python or Shell scripts. Configure thresholds and be notified when the set value exceeds.
Associate Configuration Profiles during Agent Installation
You can associate configuration profiles (like threshold, resource, notification profiles and group/display name) during the installation of the Linux agent itself. Read a use case to know how this works.
Security
The Linux server monitoring agent is written in Python and has two components: the Site24x7Agent and the Site24x7AgentWatchdog that run as two separate processes.
A root user or a non root user can install the Linux agent. Once the agent is installed, the user can opt to run the site24x7-agent as root or non root. The agent is stored in the location,
- /opt/site24x7/monagent for root
- <home_dir_of_user_who_installed_the_agent>/site24x7/monagent for non root
Collection of performance data:
Performance data is collected using shell commands like top, free, df, ps etc. Configuration data including the the agent device key (for authorization purposes) and proxy details are encrypted and stored in the agent configuration file. It is stored in the location
- /opt/site24x7/monagent/conf/monagent.cfg for root
- <home_dir_of_user_who_installed_the_agent>site24x7/monagent/conf/monagent.cfg for non root
Applications Monitoring:
Once the Linux agent is installed, Docker containers are auto-discovered and marked up for monitoring. If you wish to monitor only your servers, this option can be disabled. Learn more.
Troubleshooting Tips
A Linux server monitor consumes two basic monitors. Know the performance metrics provided for a Linux monitor.
- Find logs from a Linux server
- How Linux server monitor works
- Configure proxy for Linux agent
- Permission required to run the Linux agent in a machine
- How to set up monitoring for a cloned Linux server with the same host name?
- Why do I see a sudden spike in my memory usage once I install the server monitoring agent?
Refer our FAQ section for more information.
Related Articles
- Server monitoring architecture
- Other OS platforms supported: Windows | FreeBSD | OS X
- Server performance metrics
- Server agent checksum validation
-
On this page
- How to
- Other Features
- Add a Linux Monitor
- Restart the Linux Agent
- EditModify Existing Linux Monitors
- Uninstall the Linux Agent
- Bulk Installation Methods
- Add the Linux Monitoring Agent via Google Cloud Platform GCP
- Add the Linux Monitoring Agent via DigitalOcean user interface
- Related Articles
